![logo_2x.png]](https://support.facsware.com/hs-fs/hubfs/FACS_January_2020/Images/logo_2x.png?height=40&name=logo_2x.png)
Project Groups give you a program-level rollup without restructuring your projects:
- Easier navigation. Related Projects are listed together under one heading in the navigation menu, so long project lists are easier to scan.
- Program-level dashboards. See a dashboard for just the Projects in a group, rather than the whole Account or one Project at a time.
- Combined Log Pages. View entries from every Project in the group on a single Log Page for any Document Template.
- Focused search. Search results are limited to the group’s Projects while you’re working at the group level.
- No change to access. Users only ever see Projects they already have access to.
Setting Up Project Groups
Project Groups come from the Project Group list, which is included in every Account. Account Administrators manage it in Account Settings > Lists.
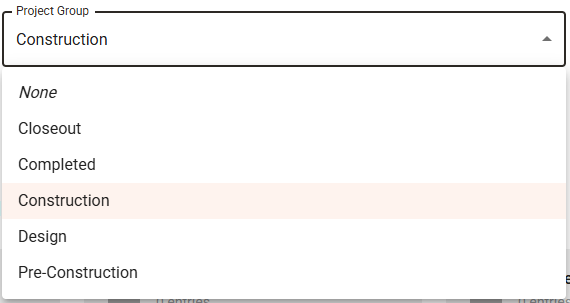
The list starts with these values, which you can keep, rename, or add to:
- Design
- Pre-Construction
- Construction
- Closeout
- Completed
Add a value for each group you want to use, such as a program name, region, or client.
NOTE: The Project Group list is a FACS standard list, so the list itself can’t be deleted. A group that has Projects assigned to it can’t be deleted either. You can rename a group at any time; its Projects stay assigned and appear under the new name.
TIP: Groups are sorted alphabetically as text. If your group names start with numbers, use leading zeros (for example, 01, 02, … 10) so they appear in the desired order.
Assigning a Project to a Group
Each Project can belong to only one Project Group. You can assign it when creating the Project or at any time afterward. Project Administrators and Project Managers can set a Project’s group.
When creating a Project:
- In the Project Creation Wizard, find the Project Group field at the bottom of the page.
- Select a group.
- Finish creating the Project.
For an existing Project:
- Go to Project Settings > General.
- Select a group in the Project Group field.
- Click Save.
To remove a Project from its group, select None in the Project Group field and save.
NOTE: When you duplicate a Project, its Project Group is carried over to the new Project.
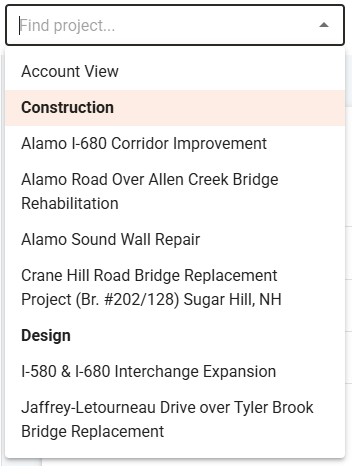
Project Navigation Menu
Once at least one Project is assigned to a group, the Project navigation menu changes:
- Ungrouped Projects are listed first, in alphabetical order, with no heading.
- Grouped Projects are listed below, under their Project Group headings. Groups are in alphabetical order, and Projects are in alphabetical order within each group.
- A group heading only appears if at least one Published Project is assigned to it.
If no Projects are assigned to a group, the menu shows a single alphabetical list of Projects, the same as before.
The Project Group Dashboard
Select a Project Group heading in the navigation menu to open that group’s dashboard. The navigation menu then shows the group’s name so you know which group you’re viewing.
The Project Group dashboard works like the Account Dashboard, but it only includes data from the Published Projects in the group that you have access to.
NOTE: The Project Group level is like the Account level with a group filter applied. Items that aren’t part of the group view, such as the File Cabinet and Reports, take you to the Account level or a Project instead.
Project Group Log Pages
From the Project Group dashboard, select a Document Template to open its Log Page. The Log Page works like the Account-level Log Page, but it only shows entries from Projects in the group, and the Project column shows which Project each entry belongs to.
There’s no separate group filter on the Log Page. The group selected in the navigation menu acts as the filter. To view a different group, select it from the navigation menu.
Searching Within a Project Group
When you’re on a Project Group dashboard or Log Page, Search only returns results from the Published Projects in that group. Results are shown on the standard search results page, including the Project column.
- Searching again stays limited to the current group.
- Selecting a different group in the navigation menu runs the search again for that group.
- Selecting a Project takes you to that Project and limits the search to it.
- Selecting the Account level takes you to the Account and searches across all Projects.
Permissions
All users can open the Project Group dashboard, but Project Groups don’t change who can see what. On the dashboard, Log Pages, and Search results, you only see data from Projects in the group that you already have access to. For example, if a group contains Projects A, B, and C and you only have access to A and B, you’ll only see results from A and B.
What Project Groups Don’t Affect
Project Groups are for navigation and viewing only. They don’t apply to:
- Project assignment
- List configuration
- Document Template or List assignment
- Notification settings
- Permissions
- Reports
If you have any questions, or need additional assistance, please reach out to our support team at support@facsware.com and we will be happy to assist you.