Project Pay Items can be uploaded using the Pay Item upload template file within the Data > Payment Settings > Items menu area.
NOTE: Due to the configurable nature of the FACS Platform, the specific name of some Labels or Field Names may differ from this example and your portal.
WARNING: Select Menu fields, such as Fiscal and Engineering Share, Unit of Measure, and others must be entered before Project Pay Items can be added to the project. Please ensure the fields populated with a Drop-Down Select Menu in the Items Data Set have the correct values before continuing. Project Pay Items cannot be saved unless all required fields are completed.
Default or General options may be created, if the project doesn't have unique values for any of the Drop-Down Select Menu fields.
Project Pay Item Template File
To start the upload process, the data needs to be in a format the Platform can read. Use the Project Pay Item template file (steps to secure this are below) to ensure the data is formatted correctly. The template file can be downloaded from the Item's Data Set area.
NOTE: Ensure to select a project from the drop-down project selection list before attempting to load Project Pay Items.
The table below outlines the standard information that can be associated with each Project Pay Item.
| Field Name | Description | Example | Required Field |
| Share | Fiscal and/or Engineering Share can be used to identify what Share an item's Authorized Quantity is from. | 01 - State | No |
| Item Number | Value of the item as provided in the project contract. | 645.1000 | Yes |
| Sequence Number | Use this field to create a unique value. Suggestion is to use leading zeros for sorting purposes, followed by the Item Number, and finished with the Share value. | 001 - 645.10000 - 01 - State | Yes |
| Description | Text description of the item as provided in the project contract. | Traffic Control | Yes |
| Unit of Measure | Increments the Item will have work recorded, and paid, by. | L.S. | No |
| Unit Price | Dollar value of each Unit of Measure. | 1.00 | No |
| Bid Quantity |
Number of units approved for use, and payment, of the item in the contract. For LS, FA or Allow based items (any item) enter the dollars as the quantity and unit price as $1.00 to allow for an exact dollar amount payment. For Change Order Items, the Bid Quantity should be entered as 0. |
40,000 | No |
| Authorized Quantity | Number of units currently approved for use, and payment, of the item. When first loading items, this value will match the Original Qty though may be modified through a Change Order. | 40,000 | No |
| Payment Type | Bid Items loaded should be tagged as "Contract" and Change Order Items can be tagged as either Force Account or Extra Work as appropriate | Contract | No |
| Requires MA | Check this box if the item requires Material Acceptance for installation and payment. If an item has "Requires MA" checked, and has been used in an Approved Daily Report, then the item must have enough corresponding Material Acceptance quantity entered for payment to be allowed in the Progress Payment Report | checked | No |
| Overrun Percent |
Some reports may allow for an item to be paid over the Authorized Quantity by a certain percent. If your projects items allow for overrun to be paid without the need for a Change Order, enter the numerical representation of that percent in this field. 1 = 100% which represents 100% of the Authorized Quantity. 1.25 = an additional 25% of the Authorized Quantity may be recorded and paid without a Change Order. Items that only allow payment up to the Authorized Quantity should have a 1 entered in this field |
1.25 | No |
| Checklist Template | If your Items have a Checklist Template Drop-Down, this means there are Item Specific questions that the Inspector must complete while filling out their Daily Reports. Contact your FACS Account Manager for additional detail | Interim Tubular Markers | No |
CAUTION: Do not add, remove or modify the column headers within the template file.
TIP: Only the required fields need to be completed within the template file for the Platform to accept the data.
NOTE: For all items paid by percent, enter the Unit Price as $1 and Quantity as the total dollar amount. This makes it easier for projects to pay an exact dollar amount.
Uploading Template File

| Number | Description |
| 1 | Log Page Menu. Open the menu to access the Upload button. |
| 2 | Upload. Users can only be Upload from the Project Role page. Adding Users to a project one at a time must be done from the Portal User area. |

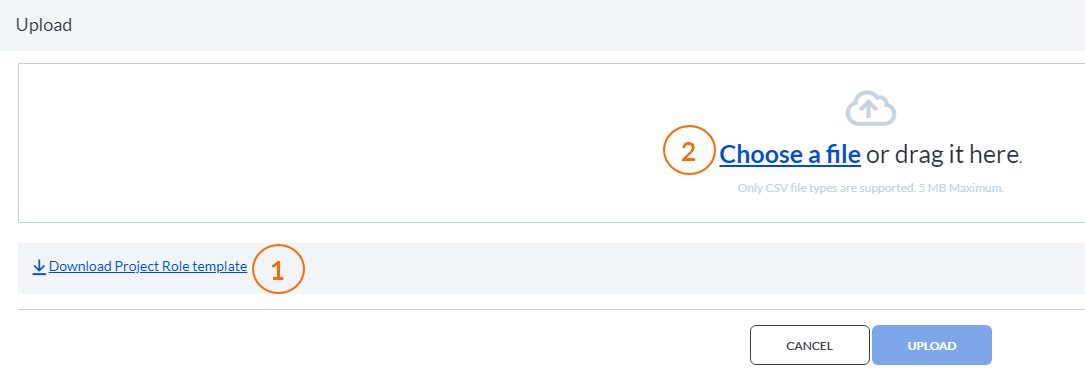
| Number | Description |
| 1 | Upload Template File. When uploading a file, download the upload template to organize the data so it can be uploaded successfully. Use the upload template to upload the data. |
| 2 | Choose a file. Once the template file has been populated and saved, select the file to start the upload process. |
TIP: It is recommended that the template file be left open until successfully uploaded – this allows for easy updates to be made and ensures the file is not reformatted during the save process.
Please view the knowledge base page on How to Resolve Common Upload File Issues to learn more.
If you have any questions, or need additional assistance, please reach out to our support team at support@facsware.com and we will be happy to assist you.
